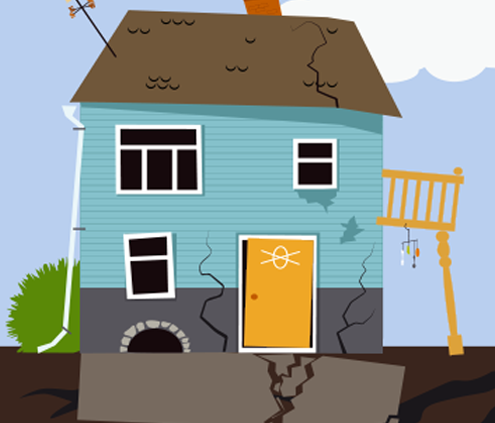
Crumbling Concrete
Feeling lucky? Are you willing to gamble over $200,000? A new foundation could cost you that and more.
Feeling lucky? Are you willing to gamble over $200,000? A new foundation could cost you that and more.
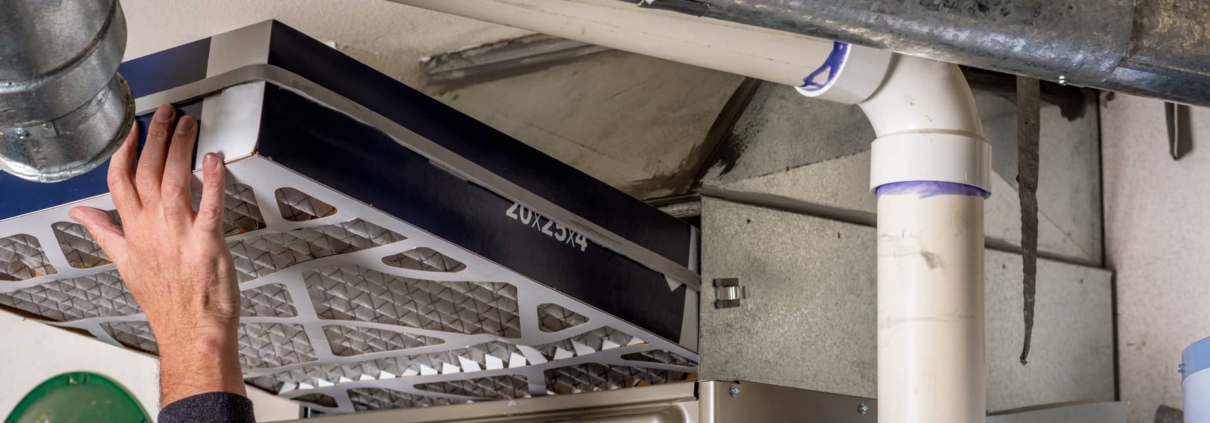
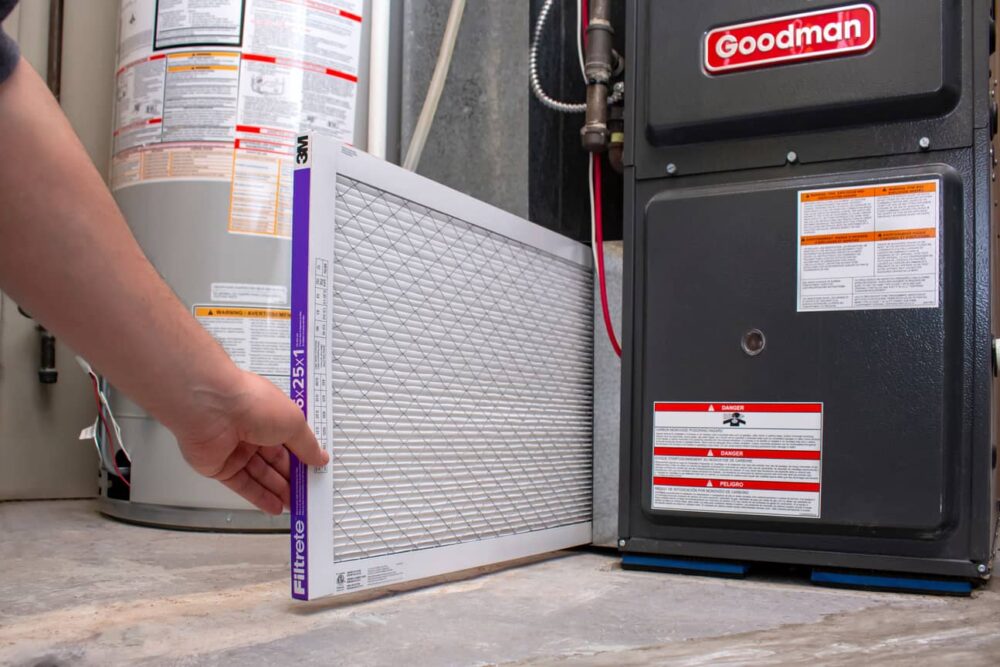
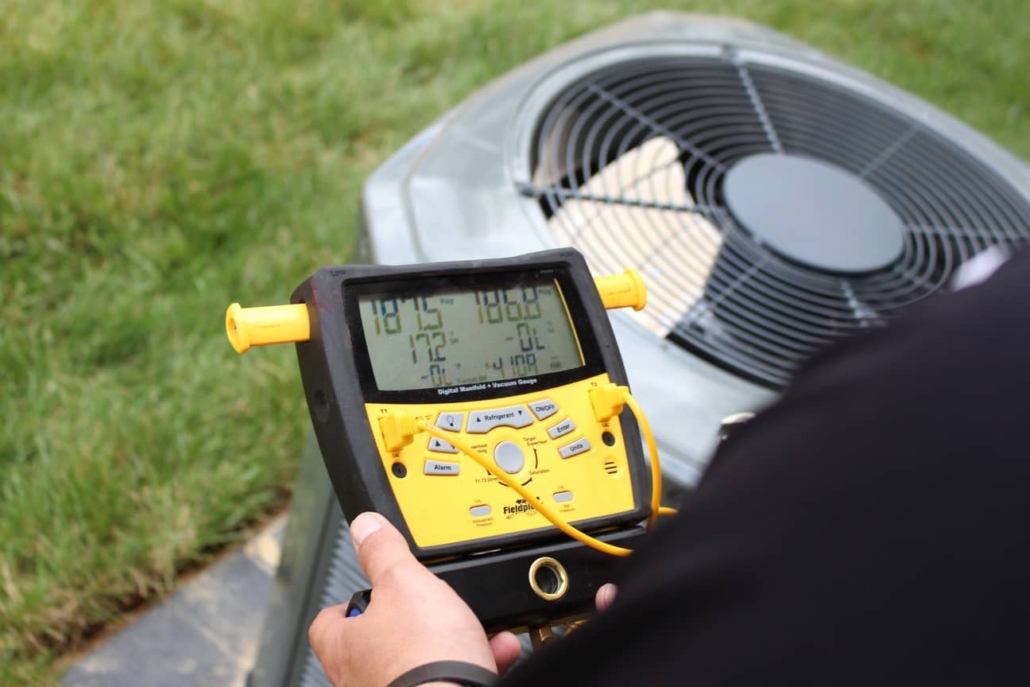
Understanding how appliances and systems work in your home is vital for maintenance and longevity. When it comes to your furnace and the winter months you want to ensure that the furnace is maintained properly. Ensuring that you have heat in your home is very important for your comfort and safety. One of the areas of maintenance that can be done by a homeowner is changing out the furnace filter. Where is the furnace filter located? Typically they are located near the floor of the furnace. In a compartment with a side door that opens.
Let’s take a look below at more details regarding where your furnace filter is located.
Getting to know your furnace is important for your family’s safety during the winter months. A furnace is what will heat your home during cold days and nights. You will typically find your furnace in the basement, center of the home, or even in a utility closet. Depending on when the home was built and how it was designed will likely determine where it is installed. In some cases, a furnace is installed in an attic space or crawl space.
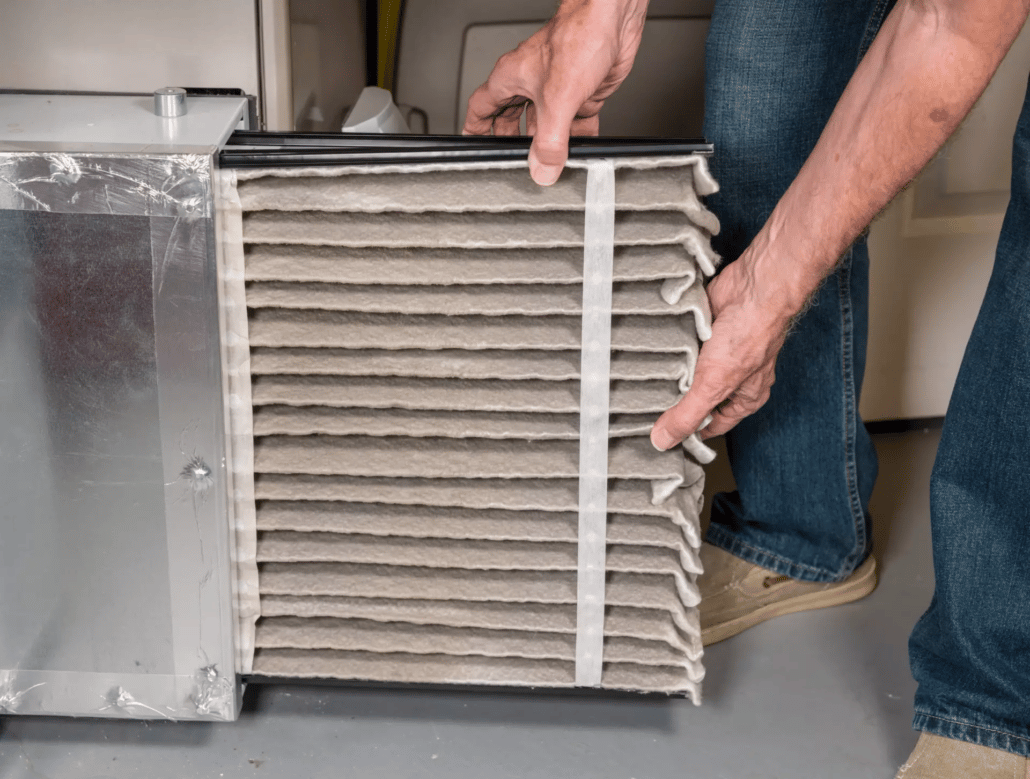
Identifying where your furnace filter is located is important for proper maintenance. Furnace filters are installed in the blower of your furnace unit. Where the blower location is, depends on how the furnace was installed. Let’s take a look at where the furnace filter might be located.
When it comes to appliances in your home, the HVAC system which includes your furnace is no different. Making sure that the furnace is well maintained ensures that you have an operational unit when the time is needed. Let’s take a look at what happens if you do not change the filter.
Replacing a furnace filter could be rather pricey. Comparatively speaking to a simple air filter, the furnace filter might be a bit more. Additionally, the price range will depend on the type of furnace, and the size of the furnace. You can count on a range of $10 to $50 per furnace filter.
Now that you know about the location of the furnace filter, there are other areas to maintain. One of those is if you notice the furnace is leaking water. If you see this happening, it could be due to a clogged line or a clogged part that keeps condensation from building up.
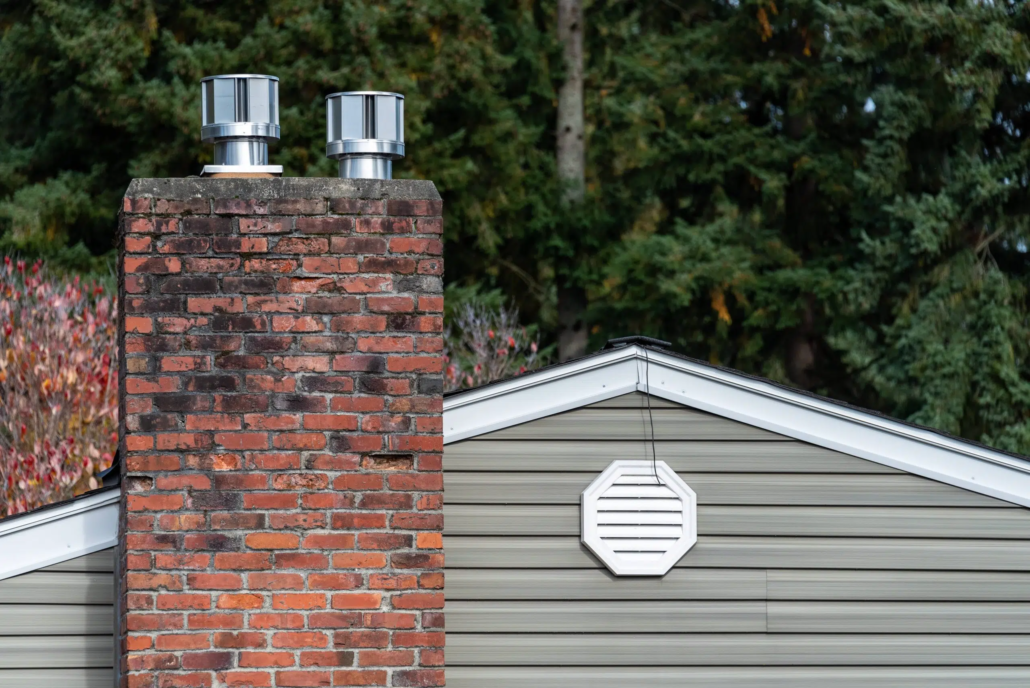
Next, since it is winter, you will probably be using your fireplace quite a bit to stay warm. Thus, you will want to make sure your chimney has a cap so that it protects against the outside elements. However, if you are missing a chimney cap, you will need to contact a fireplace installation company.
Lastly, you will want to make sure your stone fireplace is clean and you have protective gear, a bucket, a scrubbing sponge or brush, and a liquid solution. These are the first items that you need to accomplish this task.
When there is an issue with your furnace or HVAC system, immediately call a professional. Most homeowners are not capable of repairing their furnaces or HVAC systems due to various code requirements. If you aren’t sure who to call, reach out to your local home inspection team. They can inspect your HVAC system and furnace during a complete home inspection. Also, they can refer you to a reputable furnace or HVAC service technician.
Furnace filters should be replaced every 90 days or before. If you expect your HVAC system to work efficiently, you will want to replace the furnace filter as it collects dirt, debris, and pet hairs daily. Consequently, if you are looking to find out how efficiently your furnace is working or if you need to replace any parts, call on your local home inspection team. Reach out to Warren Inspections in Eastern and Central Massachusetts for an HVAC inspection and furnace inspection, along with a full home inspection.

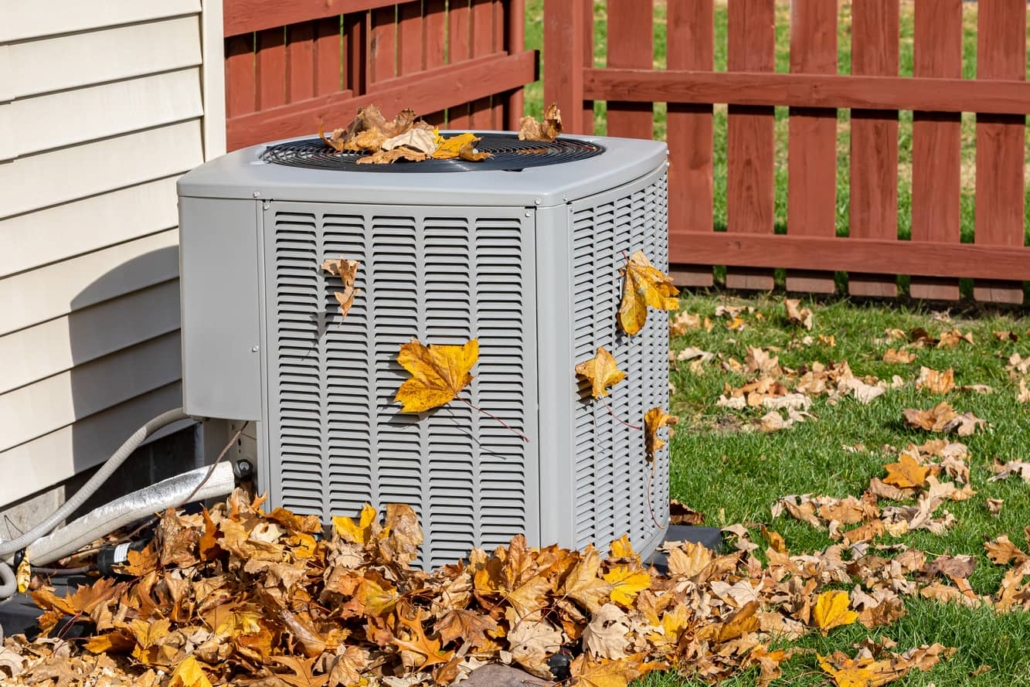
Owning a home requires a lot of maintenance and attention to detail. When it comes to your air conditioning, keeping up with the maintenance is a must. Consequently, you should consider reading up on the exact make and model of air conditioning that is associated with your home. This allows you to understand how to control the moisture conditions in your home. Does humidity affect air conditioning? Yes, if you have high humidity in your home, the air conditioner has to work harder.
Let’s take a look below at some more details regarding high humidity in your home.
Just like any other working appliance that uses electricity, humidity can definitely affect the way your air conditioning works. Let’s take look at how high humidity is caused in your air conditioner.
The other main reason for the high humidity is the unit is too old. As parts start to grow old they wear down. This prevents the unit from working as efficiently as possible. Maintain your system on a regular schedule so that this does not occur. Also, if you notice that temperatures and cooling have not been consistent, it might be time to repair or replace your ac unit.
Believe it or not, high humidity can affect your air conditioner. If the humidity levels are excessive, the air conditioner will need to work harder. Keep in mind that if your air conditioner has to work extra hard, it does not have the capability of keeping up with your home’s cooling capacity needs. Also, if this occurs, you will likely never feel a cooler temperature in your home. Let’s take look at the common signs of high humidity inside the home.
Now that you have an understanding of high humidity and how it can affect your air conditioner, you can create a solution to keep your system working properly. The main area that you should consider is what maintenance is needed to keep your system working correctly.
Next, if you are really concerned about moisture or humidity buildup, you might want to have your chimney cap checked out. If you have a fireplace and your chimney cap is damaged, wind and rain can enter your fireplace. This would create a larger moisture issue in your home. Also, if water gets into your chimney it could increase the dampness and humidity in your home.
Lastly, read up on when you can replace your HVAC system. If you are having major humidity issues with your air conditioner, it might be time to replace the HVAC unit. Make sure that you understand when it is time to replace, rather than repair your air conditioner.
The moment that you are having an issue with your air conditioner, you will want to call on a professional. Hiring a professional HVAC service technician is key. Consequently, working on an air conditioner is not for homeowners. You must have a professional license in order to work on any HVAC equipment.
Also, if you aren’t sure who to call, reach out to your local home inspection team. They can inspect the entire HVAC system which includes the air conditioning. Additionally, they can recommend a reputable HVAC service technician.
Anytime that your air conditioner is having issues there could be a variety of reasons why. Hiring a professional HVAC service technician can help you determine what issues you might be having. Conducting proper maintenance on your air conditioning unit can save you a lot of money.
Reducing the humidity in your home can help keep the longevity of your air conditioning. Be sure to hire your local home inspection team to have your air conditioner inspected and the moisture levels in your home measured. Reach out to Warren Inspections in Eastern and Central Massachusetts for an HVAC inspection, along with a full home inspection.

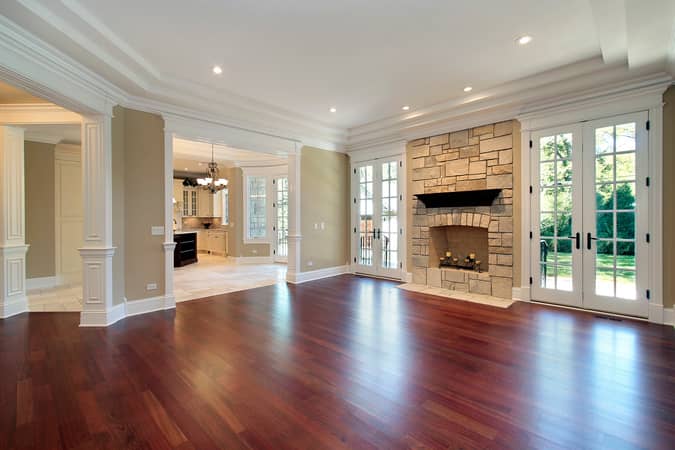
When home buyers are searching for their dream home, amenities are really what they want. The more amenities that a home buyer can grab with a new home, the more apt they are to buy the home. Additionally, many home buyers have a pre-set list already made with regard to their amenity needs. Flooring is always at the top of the list for home buyers. Carpet in the main living areas is phasing out over the past ten-plus years. Oftentimes you will see hardwood or ceramic tile flooring as the top choice in a home. Both styles come with a misnomer that your home will be cooler if you have tile or hardwood flooring. Do hardwood floors make your house colder? They absorb heat better than a carpet does. So, no, hardwood floors do not make your house colder.
Let’s take a look below as to why hardwood floors might feel cold but are really good at trapping heat and circulating air.
When it comes to wood floors, most people feel the coolness when they touch the floor. Homeowners will often put down area rugs, wear socks, or even use a space heater in their homes to keep the cold feeling away. However, wood flooring can actually trap heat longer than carpet can. Let’s take a look at why this is possible.
Depending on the type of hardwood floors will determine its ability to retain heat. Also, it will determine the energy-efficient rating.
Just because wood flooring is a great insulator that keeps the heat in and circulates it more continuously through your home, does not mean your feet don’t feel cold on the floor. Let’s take a look at some ways to protect our feet from being cold.
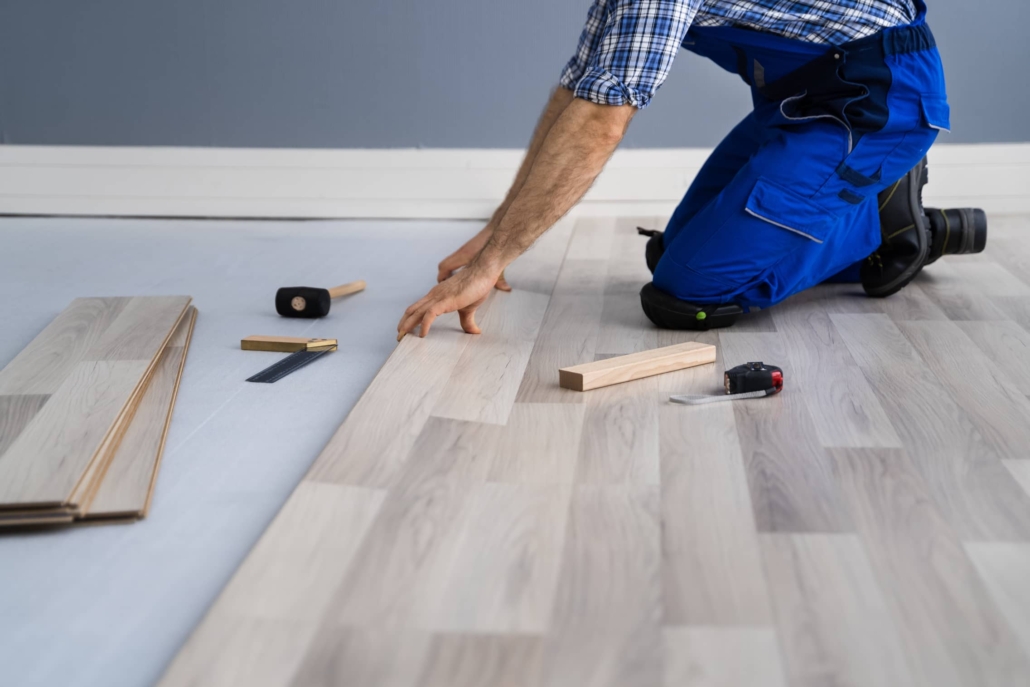
Now that you understand what hardwood floors can do for your home, it is a good idea to also read up on the maintenance of hardwood floors. In some instances, homeowners find themselves in an unfortunate situation as they are freshening up their paint. If you happen to spill paint onto your hardwood floors, do not freak out. It is possible to get the paint off the hardwood floor.
Next, be sure to explore other ways to save on your electric bill and keep the heat in during the winter months. Winterizing various parts of your home could end up saving you a lot of money. If you happen to have sliding doors and windows that are drafty, read up on how to insulate your sliding door and windows.
Lastly, if you have a fireplace and chimney you will want to ensure that you have a chimney cap in place. A chimney cap will keep cold and drafty air from rushing down your chimney and into your living area. No hardwood floor could possibly absorb enough heat to combat a cold blast of winter air.
Anytime you have a question regarding your flooring, you should seek the advice of a professional contractor that specializes in flooring. Seeking advice from professionals allows you to make an informed decision and not waste your money. If you aren’t sure who to call or if there is no flooring store in your area, reach out to your local home inspection team. They can inspect your current floors and recommend which flooring would make sense for your home. Keeping your investment intact and looking aesthetically pleasing is key. Also, they can refer you to a reputable flooring contractor before you go wasting your money.
Now that you understand how wood floors can benefit your home, it might be a great time to price out a flooring upgrade. On the other hand, if you already have wood floors, you just learned how great they are at helping keep your home warm. If you still aren’t sure what floors are in your home or if it is time to replace them, call on your local home inspection team. Reach out to Warren Inspections in Eastern and Central Massachusetts for a flooring inspection, along with a full home inspection.
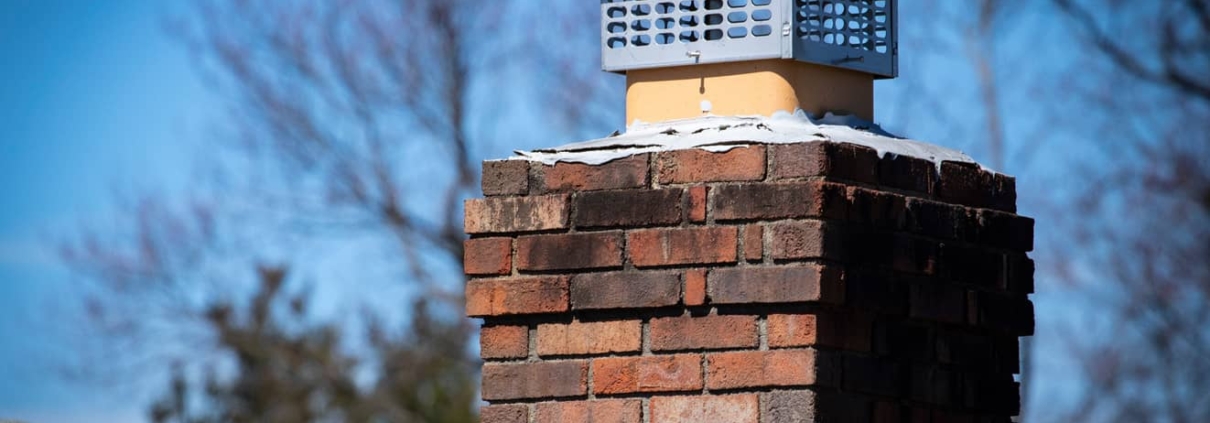
Having a fireplace in your home can be a very fun amenity. Not only does it provide an aesthetic value to the home, but it also adds to the functionality of your home. When purchasing a home with a fireplace, keep in mind that there are many working parts to a fireplace. The chimney, chimney flue, openings in the top and bottom, fireplace tools, and chimney cap are just a few of the working parts of a fireplace. Just like many other items in your home, a fireplace and its chimney will need maintenance. Having your chimney cap replaced or regularly maintained is very important for protecting your home from a fire. Do roofers install chimney caps? You will want to call on a professional fireplace installation company to properly install a chimney cap.
Let’s take a look below at more details regarding a chimney cap.
Most homeowners are used to seeing a chimney cap, but really had no idea of what it was called. Chimney caps sit on top of the chimney, much like a crown sits on top of a person’s head. They are made of a metal material and placed on top of the chimney opening. This creates a barrier from the outside elements to the inside of the chimney. They will protect your chimney flue from rain and snow, as well as, critters and other flying debris.
Chimney caps are great at protecting your fireplace. Installing a chimney cap can ensure that you have reduced the risk of debris being built up in your fireplace chimney. In turn, this reduces the chance of a house fire or smoke bellowing into your home. Let’s take a look at some more specifics as to why you need a chimney cap.
Believe it or not, there are a variety of choices when it comes to selecting a chimney cap. In order to make the right selection of chimney caps, you must first know what type of chimney you have. Let’s take a look.
Now that you have determined the type of chimney that you have, you can select a chimney cap. Let’s look at our options.
Also, keep in mind that you can have any chimney cap custom-made out of any of the materials listed above.
Having a new chimney cap installed can be relatively inexpensive. It really comes down to the size, style, and type of material that you have chosen to purchase. You can count on the following price ranges for each style of a chimney cap.
Now that you know about chimney caps, let’s take a look at other areas of maintenance. One of those is removing snow from the roof. Winter will be here soon and it is important to know that your roof can hold up to 20 pounds of snow per square foot. In fact, the snow will usually slide off the roof on its own. If it doesn’t, you can use a snow rake, heating cables, or a snow guard.
Next, making sure your roof vent is covered is a good idea. The roof vent cover helps keep birds and other animals out. Sometimes this vent gets clogged and you will know if the toilet gurgles, a slow drain, a dry P-trap, or a build-up of leaves and debris.
Lastly, if you find out you need a new roof, the time it takes to replace it will vary. It takes a day to remove the old materials and a day to have the team get started on the installation. Asphalt shingles take one day, while concrete tile can take up to two weeks.
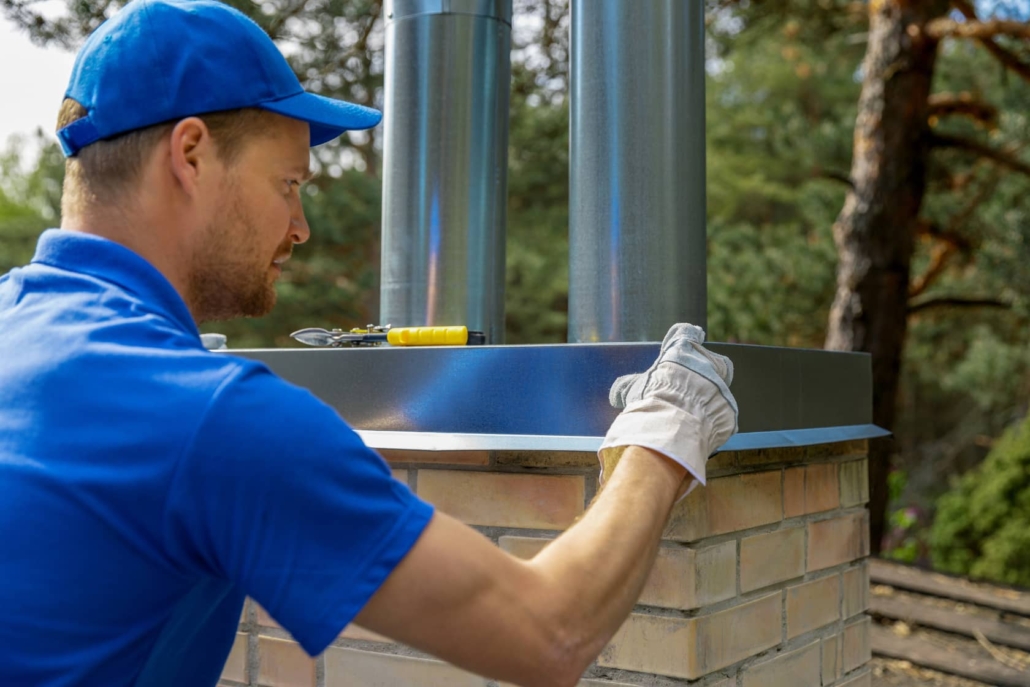
Call on a professional to assist you with the installation of a chimney cap. You will want to get this right, or you can risk having a house fire. Also, hiring a professional will allow you to have your chimney swept while you are getting a new chimney cap installed. If you aren’t sure who to use in your area, reach out to your local home inspection team. They can inspect the entire fireplace, as well as refer you to a reputable fireplace technician.
Maintaining your fireplace is vital to ensure your home is not in any danger. Many homeowners love the amenity of a fireplace in their homes. The fireplace allows you to warm up your home during the colder months and not rely on any central heating unit. Although, many homeowners will use their central heating in addition to warming up with a cozy fire. If you are in need of fireplace maintenance or even are concerned about the functionality of your fireplace, reach out to Warren Inspections in Eastern and Central Massachusetts for a roofing inspection which includes the chimney, along with a full home inspection.
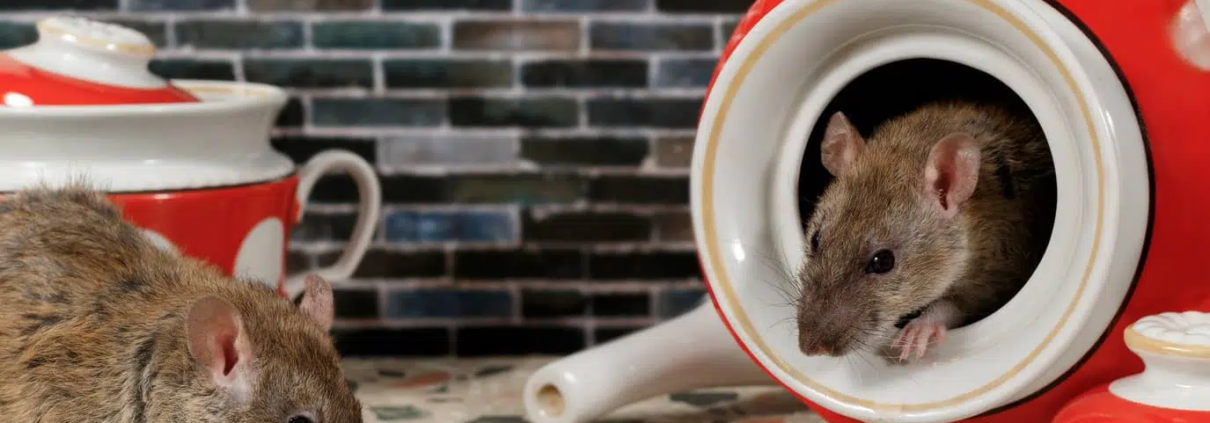
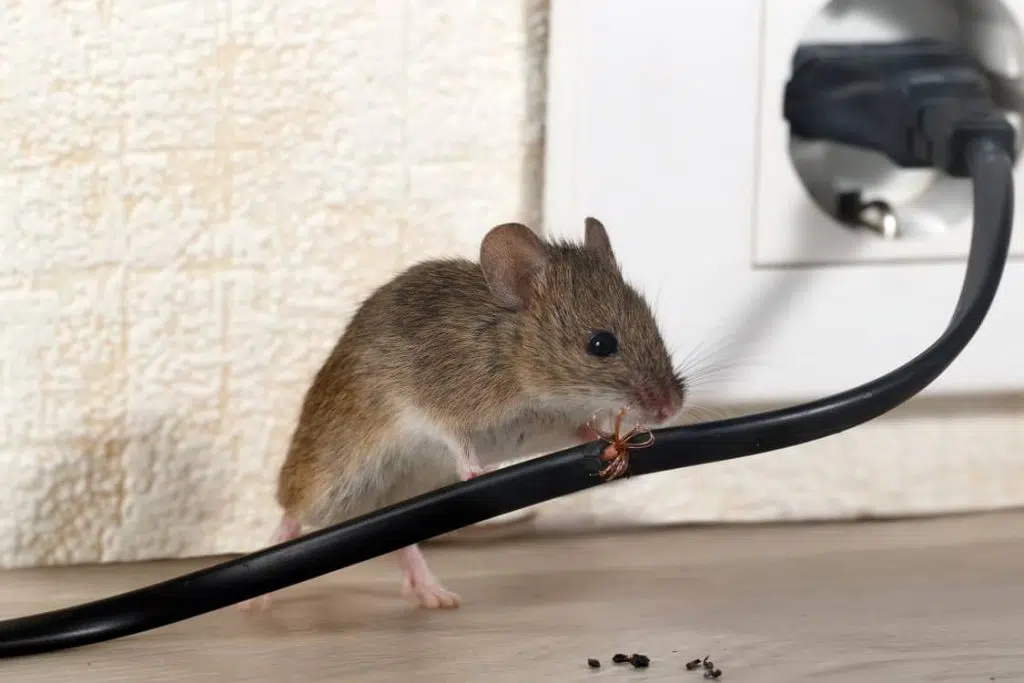
Coming home from a long day at work and you just sit down on the couch to read a book. You begin reading your book and start to hear some scratching and pitter-patter that sounds like it is coming from above you. As a homeowner, you are deeply afraid of what it could be. Rodents include, rats, mice, bats, and squirrels are all possibilities. You decide to take a look outside the home to inspect it for any obvious signs of entry. Surprisingly, you notice an opening under your soffit. It’s time to call your local pest control company. You must act fast before the damage is too extensive. What sort of damage do rodents cause? They will chew through anything. Wires, cardboard, plastic, and insulation. They love it all.
Let’s take a look below at some details regarding what kinds of damages rodents can cause.
Believe it or not, rodents like to chew on a lot of items There really isn’t anything that a rodent won’t chew through. They gnaw on things like wires, cardboard, drywall, plastic, and anything that can provide them with food. In doing so, structural damage is highly possible through their gnawing, nesting, and defecating. Let’s take a look at some of the damages caused by rodents.
Mice and rats like to build nests in your home and leave their feces and urine everywhere they go. Rodents like these are capable of spreading diseases and using their sharp teeth to eat through wires. Any rodent infestation that occurs will need proper rodent control.
The easiest way to prevent rodents from causing damage in your home is to hire a local pest control company. However, there are some things that you can do to not make it so attractive to rodents. Let’s take a look below at what we can do.
Now that you understand what type of damage rodents can cause, let’s look into what a rat’s nest looks like. If you understand what the nests look like, you can better understand what to keep away from your home so that rats don’t use it as a nest.
Next, if you notice that you have rodents in your walls, you might want to read up on how to get them out. The local pest control company might not be available to get to you in a timely manner. If this is the case, you will want to act fast and work to get them out on your own.
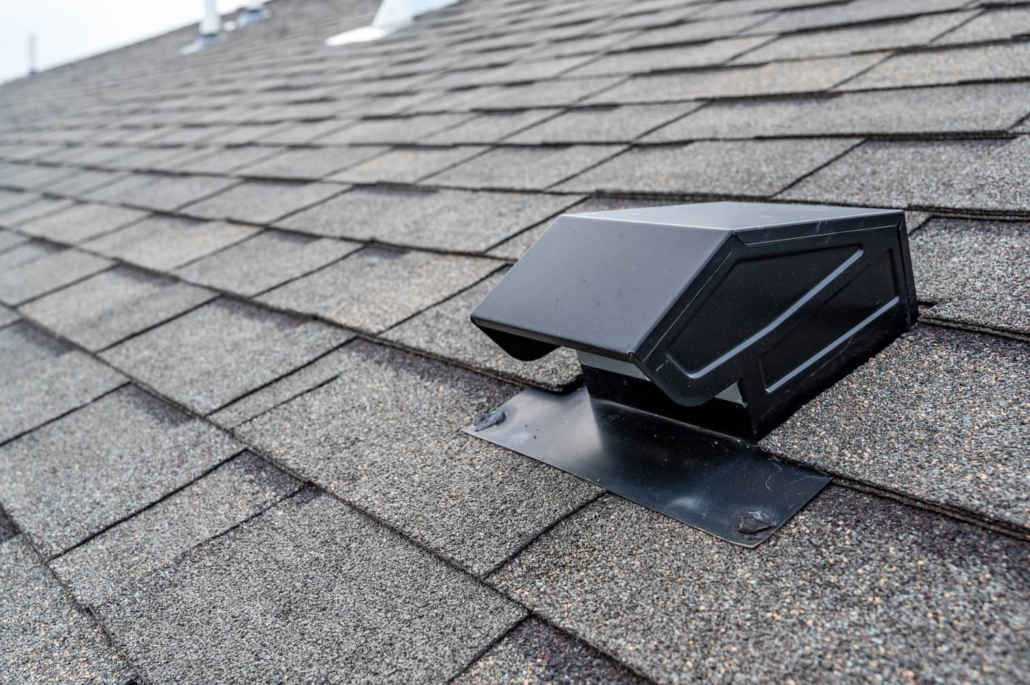
Lastly, make sure to inspect your roof vent pipes. There are a few varieties of vent pipes and rodents like to nest in them. Also, birds will often create a nest in the roof vent pipes and this could be bad for getting gases out of your home as needed. Look into what products you could use to cover certain roof vent pipes. Mesh screening is one item that often works.

As soon as you notice a sign of a rodent, you will need to call your local pest control company. As a homeowner, it is not warm and fuzzy thinking about what the squeaks and scratching in the walls might be. Be sure to call a pest control company that takes your health seriously. Having an environmentally friendly approach is important. If you aren’t sure who to call reach out to your local home inspection team. They can inspect your home for any potential rodent access and also refer a reputable pest control company.
If you notice a rodent’s nest in your home you will likely have to temporarily move out. Exterminating rodents is not the easiest, especially when there are a lot of them. For your health and safety, moving out while the pest control team takes over and exterminates the rodents is key. Rodents can carry diseases and also turn your home into a very foul-smelling odor. Reach out to Warren Inspections in Eastern and Central Massachusetts for a pest inspection along with a full home inspection.

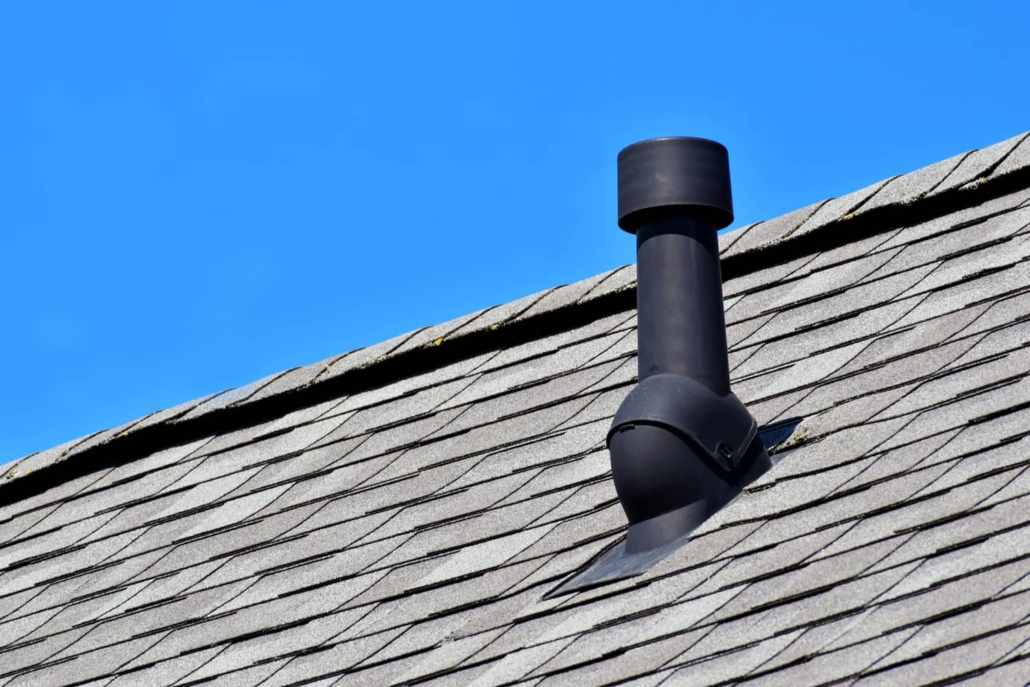
When it comes to covering a roof vent pipe, it will depend on the type of vent pipe you are looking at. Homeowners will often look to cap a plumbing vent pipe with the idea that this keeps debris from the plumbing system. However, this could end up causing the homeowner more issues with their plumbing systems’ functionality. Should a roof vent pipe be covered? Keeping a vent pipe covered is meant to keep birds from nesting and other debris out of the pipe.
Let’s take a look below at some more details regarding the covering of a roof vent pipe.
In some cases, a vent boot is needed on your vent pipe. A vent boot is a rubber vent cap cover that helps seal the pipe and protect the pipe from dirt and debris. Since a vent boot is made of rubber, it can expand and contract in various weather conditions.
The moment that you begin to notice dirt and water damage in your home, it is potentially due to a worn vent boot. Vent boots can break down over time due to extreme weather conditions. Let’s take a look at some warning signs that our vent boot has broken down.
Believe it or not, there can be a variety of vent pipes on your roof. Depending on where you live, determine the building code requirements for considering whether should roof vent pipe be covered. Let’s take a look at the main vent pipes.
In the event that a roof vent pipe gets clogged, you will notice a few signs regarding this issue. These are the reasons why homeowners aren’t sure if roof vent pipes should be covered. Let’s take a look.
Now that you know about the vent pipe, let’s take a look at other areas of maintenance on the roof. If you are noticing your roof tiles are looking dull, you can paint them to make them shiny. However, if they are terra cotta material, then you cannot. This is because terra cotta is made of clay and is porous so a good cleaning will help the color.
Another area is finding a roof leak. If you don’t have an attic and are trying to find where the roof leak is, you can let the water run down the damaged spots on your roof and then check the stains. If you aren’t sure, contact a professional for assistance.
Lastly, if you are doing a home inspection, a home inspector will check for visible mold. However, if they don’t have a mold testing service, you will need to hire an additional company to find and test the mold. It is a good idea to hire a home inspection company that has both as it will save you time and probably money.
When it comes to anything related to your roof, you should call a professionally licensed roofing contractor. They could explain to you what each pipe is associated with that is on your roof. If you aren’t sure who to use, call on your local home inspection team. They can inspect the roof for any damage and recommend a reputable roofing contractor.
Always know that roof pipes are vital to the functionality of your home. Your roof pipes’ purposes are to keep your home clear of bad gases. If you notice an issue with your roof pipes you will need to get them fixed right away.
It is a good idea to conduct a roofing inspection with your local home inspection team once a year or after a major storm. Reach out to Warren Inspections in Eastern and Central Massachusetts for roofing inspection along with a full home inspection.
When it comes to owning a home, there are many projects that homeowners must remember. However, testing your home for various elements in the air is not typically one that homeowners remember. It isn’t often that homeowners even consider testing anything in their homes. Additionally, testing is necessary for your home when you buy, sell, or live in the home. The great thing is that there are licensed contractors and home inspection teams that can conduct these various tests for you. For example, testing for Radon in your home is a fairly common necessity. Radon gas comes from the earth and can enter your home fairly easily if the correct options are presented. Are Radon levels higher in the basement? The assumption is based on a basement having many accessible entry points.
Let’s take a look below at what Radon is and where it comes from.
A radioactive gas that is a product of decaying uranium and is naturally occurring in the soils on earth is Radon. The gas rises and as it makes its way through the soil it releases into the air. Radon gas can enter your home through cracks and crevices in your walls and the home’s foundation or basement. Radon gas can also be found coming from well water.
There are many places Radon gas is known to come from. Since it is a naturally occurring gas that is released from our soil, we have zero control over it. Are Radon levels higher in the basement? Let’s take a look below at where Radon gas is known to come from.
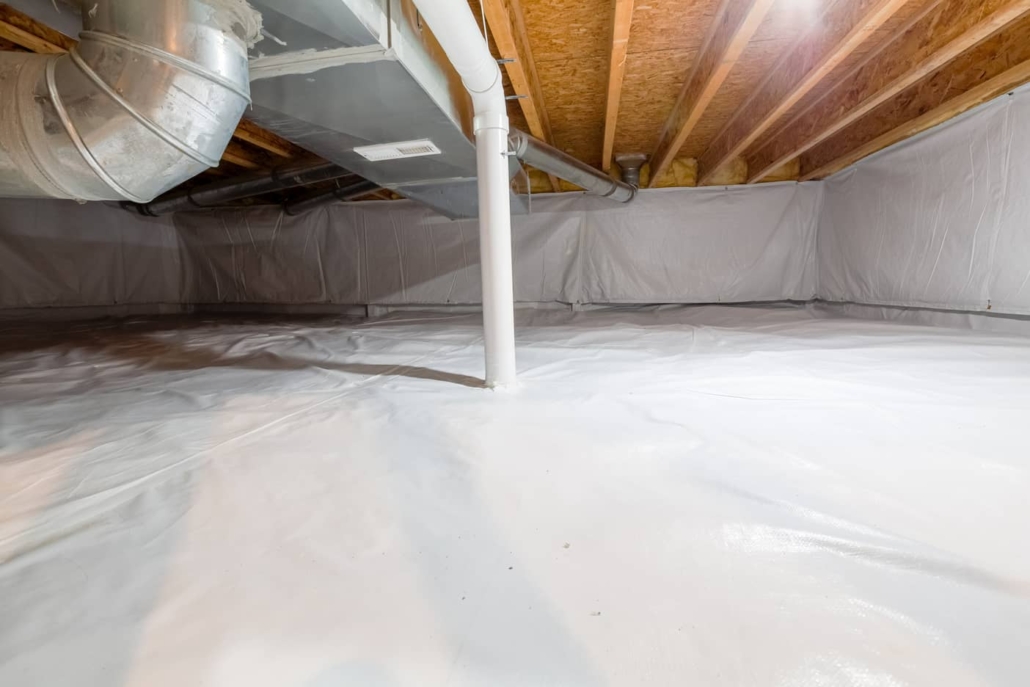
Believe it or not, the basement is not the only place Radon gas can enter a home. However, the Radon gas levels in a basement are likely to be higher, as basements have many possible entry points. Let’s take a look at some of those entry points.
Also, keep in mind that Radon gas can pass through a concrete slab regardless of how sealed up cracks and crevices are.
Most homeowners are not aware that there are a variety of ways to test for radon. There are systems available called Radon mitigation systems, that detect and alert you of the Radon levels in your basement and in the home. They provide great functionality in protecting your family’s health and safety. Let’s take a look below at the various ways a professional service can test for radon.
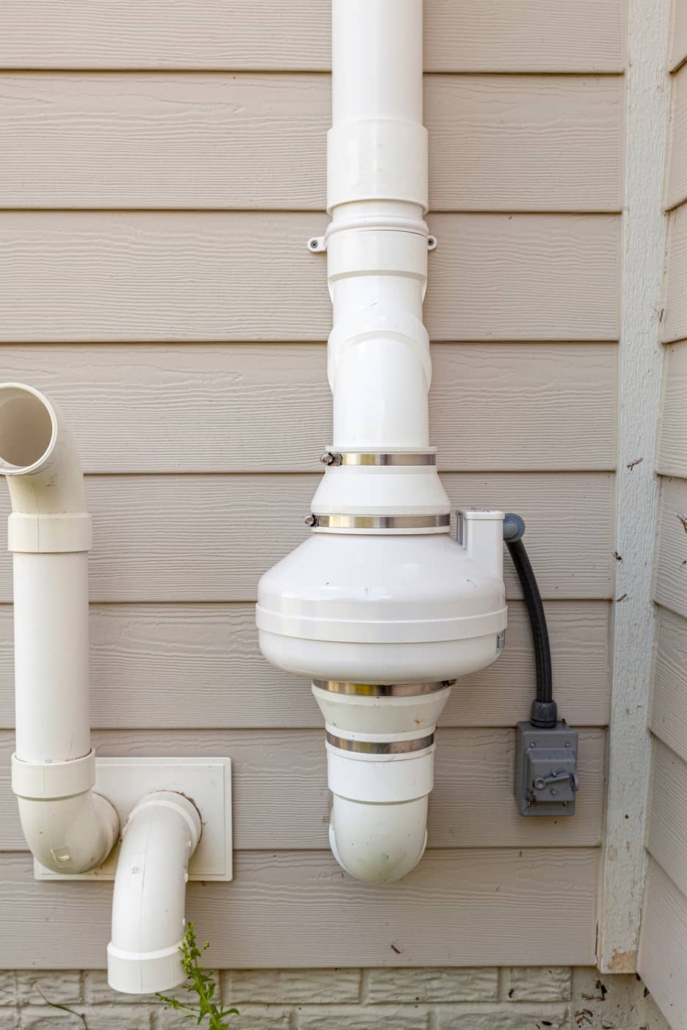
Getting a Radon mitigation system installed in your home could cost you between $750 and $5,000. This cost variation is dependent upon how big your home is. If you are simply looking to have your home tested for radon, the national average cost for a Radon test is $150 to $350. This is a great investment into your family’s health and safety. Also, keep in mind that if you get a full home inspection conducted, you could get an add-on radon test for a cheaper rate.
While you are on the topic of inspections and testing. It is also a great idea to get a wind mitigation inspection completed. Your local home inspection team can conduct a wind mitigation inspection at the same time as they conduct your Radon gas test. It is always a great idea to have multiple inspections or tests done on your home at the same time, to save money.
Additionally, you should not forget to have a mold inspection conducted on the home. A great way to prevent any major damage and health issues in your home is by taking the extra step and having a mold inspection completed. Your local home inspection team can complete this at the same time as they conduct their Radon gas test.
Lastly, make sure that your mold inspection is thorough. Just like how Radon gas can travel up and out of the home, mold spores can also travel up from the basement and into the main living space. Any basement that is damp and dark and has high moisture immediately becomes a breeding ground for mold production. Be sure to have your basement thoroughly inspected for mold.

Hiring a Radon mitigation team to conduct a test for radon levels in your home is a great idea. Taking an aggressive approach to monitoring and testing various gases in the air will only help preserve your health and safety. As a homeowner, it is imperative to conduct a Radon mitigation test approximately every two years. Reach out to your local home inspection team and they can conduct the test for you.
No matter where you live, it is a great idea to conduct a radon mitigation test every two years. In order to protect your family’s health and safety, you will want to test your home for various gases such as radon and carbon monoxide. Because these gases are odorless, tasteless, and colorless, you have no idea of the levels in your home. Testing of the home should be done regardless of if you are buying, selling, or living in the home. Call on your local home inspection team to get your Radon gas test conducted today. Reach out to Warren Inspections in Eastern and Central Massachusetts for a radon test and all of your home inspection needs.
![]()